
Setting up a custom domain is the first step in white-labeling Voice AI Portal. Your custom domain allows you and your clients to access the platform through your branded URL instead of the default Voice AI Portal address.
Before You Begin
Setting up a custom domain requires access to your domain’s DNS settings. Make sure you have the necessary permissions to modify DNS records and have chosen a subdomain for your white-labeled platform. This guide will walk you through the entire process, from entering your subdomain to verifying successful configuration
Domain Requirements
- Subdomain required: You must use a subdomain like app.youragency.com or dashboard.youragency.com
- Apex/root domains NOT supported: Domains like youragency.com cannot be used because CNAME records are required.
- DNS access: You need access to modify DNS records for your domain
Recommended Subdomain Names
Common subdomain choices for agencies:
- app.youragency.com
- dashboard.youragency.com
- portal.youragency.com
- voice.youragency.com
- clients.youragency.com
Step-by-Step Setup
Step 1: Navigate to White-Label Settings
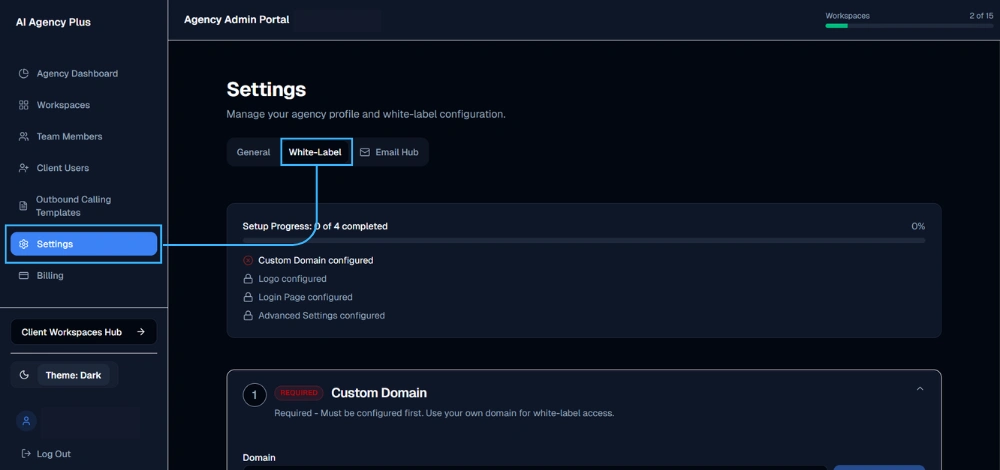
- Log into your Voice AI Portal account
- Click Settings in the left sidebar
- Click the White-Label tab at the top of the page
- Locate the Custom Domain section (marked as “REQUIRED” and “1” in setup progress)
Step 2: Enter Your Subdomain
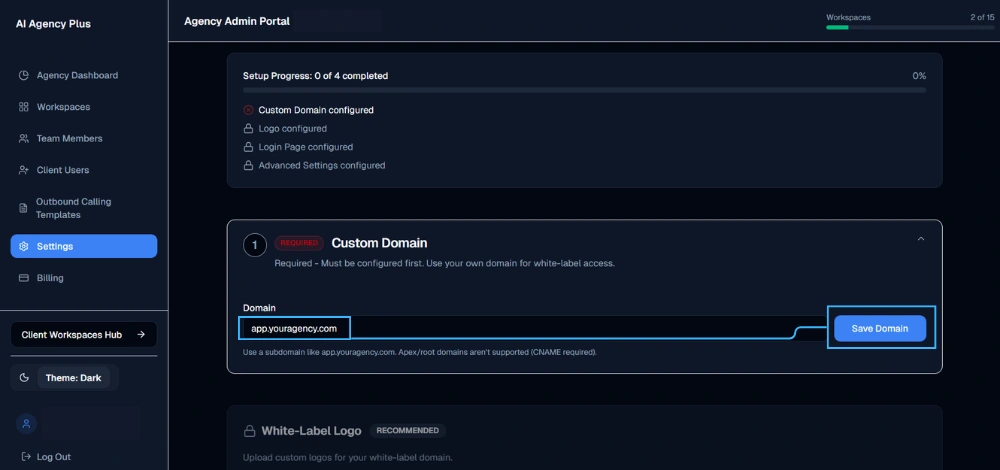
- In the Domain field, enter your chosen subdomain
- Example:
app.youragency.comordashboard.youragency.com
- Example:
- Click Save Domain button
Important: Only subdomains are accepted. If you enter an apex/root domain (like youragency.com), you’ll see an error message.
Step 3: View DNS Configuration Requirements
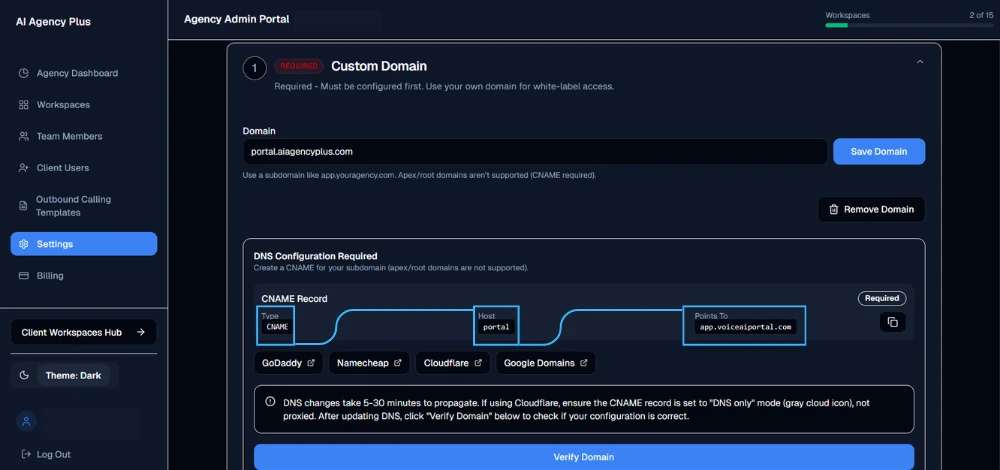
After saving your subdomain, you’ll see the DNS Configuration Required section appear. This displays the CNAME record you need to create.
You’ll see:
- Type: CNAME
- Host: Your subdomain (e.g.,
dashboard) - Points To:
app.voiceaiportal.com - Quick links to popular DNS providers (GoDaddy, Namecheap, Cloudflare, Google Domains)
Step 4: Create CNAME Record in Your DNS Provider
Now you need to add the CNAME record to your domain’s DNS settings. Choose your DNS provider below:
Option A: Cloudflare
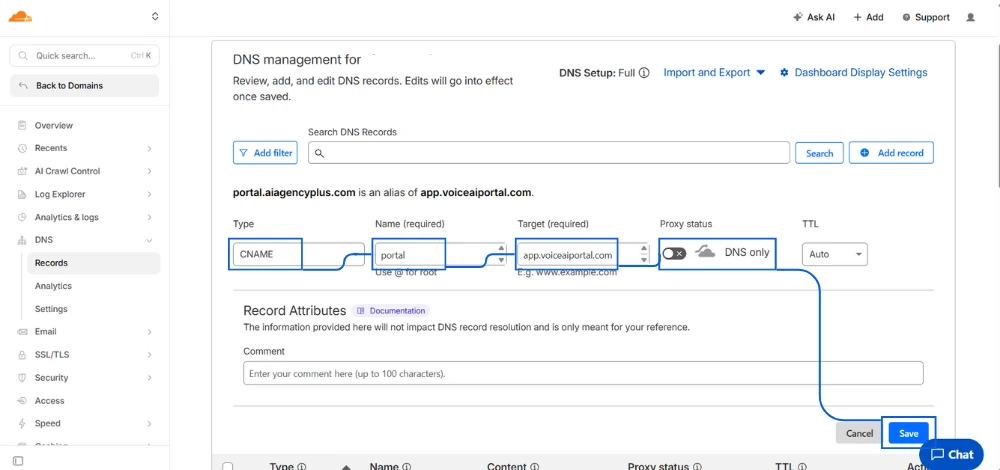
- Log into your Cloudflare account
- Select your domain
- Go to DNS > Records
- Click Add Record
- Configure the CNAME:
- Type: CNAME
- Name:
dashboard(or your chosen subdomain prefix) - Target:
app.voiceaiportal.com - Proxy status: DNS only (gray cloud icon) ⚠️ CRITICAL
- TTL: Auto
- Click Save
⚠️ Cloudflare Important Note:
If using Cloudflare, you MUST ensure the CNAME record is set to “DNS only” mode (gray cloud icon), NOT proxied (orange cloud icon). Proxied mode will prevent domain verification from working correctly.
Option B: GoDaddy
- Log into your GoDaddy account
- Go to My Products > DNS
- Click Add in the Records section
- Configure the CNAME:
- Type: CNAME
- Host:
dashboard(your subdomain prefix) - Points to:
app.voiceaiportal.com - TTL: 1 Hour (or default)
- Click Save
Option C: Namecheap
- Log into your Namecheap account
- Go to Domain List > Click Manage on your domain
- Select Advanced DNS tab
- Click Add New Record
- Configure the CNAME:
- Type: CNAME Record
- Host:
dashboard(your subdomain prefix) - Value:
app.voiceaiportal.com - TTL: Automatic
- Click the green checkmark to save
Option D: Google Domains
- Log into Google Domains
- Select your domain
- Click DNS in the left menu
- Scroll to Custom resource records
- Configure the CNAME:
- Name:
dashboard(your subdomain prefix) - Type: CNAME
- TTL: 1H
- Data:
app.voiceaiportal.com
- Name:
- Click Add
Other DNS Providers
If your DNS provider isn’t listed:
- Find the DNS management or DNS records section
- Add a new CNAME record with:
- Name/Host: Your subdomain prefix (e.g.,
dashboard) - Value/Points To/Target:
app.voiceaiportal.com - TTL: Default or 3600 seconds
- Name/Host: Your subdomain prefix (e.g.,
Step 5: Wait for DNS Propagation
After creating the CNAME record:
- DNS propagation takes 5-30 minutes on average
- Some DNS providers may take up to 48 hours
- During this time, your domain is being configured across global DNS servers
Check propagation status:
You can verify if your DNS changes have propagated globally by using whatsmydns.net:
- Go to whatsmydns.net in your browser
- Enter your full subdomain (e.g.,
dashboard.youragency.com) - Select CNAME from the dropdown menu
- Click Search
- Look for green checkmarks showing
app.voiceaiportal.comas the result across multiple locations worldwide
When you see green checkmarks in most locations (especially your region), your DNS has propagated and you’re ready to verify your domain in Voice AI Portal.
Step 6: Verify Your Domain
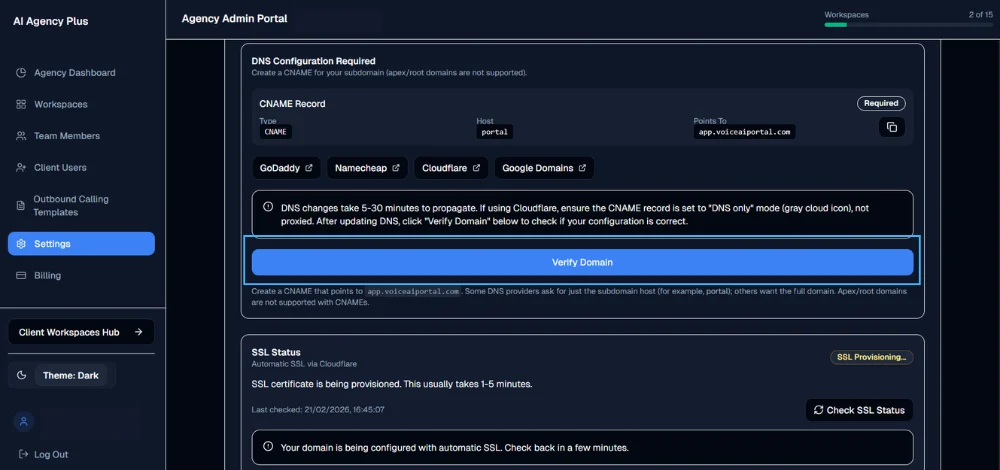
- Return to Settings > White-Label in Voice AI Portal
- Click the blue Verify Domain button
- Voice AI Portal will check if your CNAME record is configured correctly
Once DNS changes have propagated:
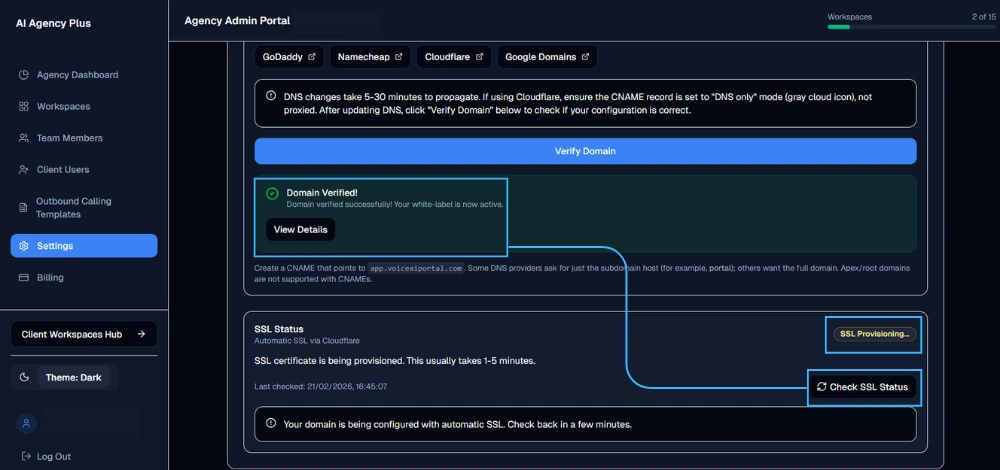
If verification succeeds:
- Your custom domain is now active
- “Custom Domain configured” will be checked in setup progress
- You and your clients can access the platform via your custom domain
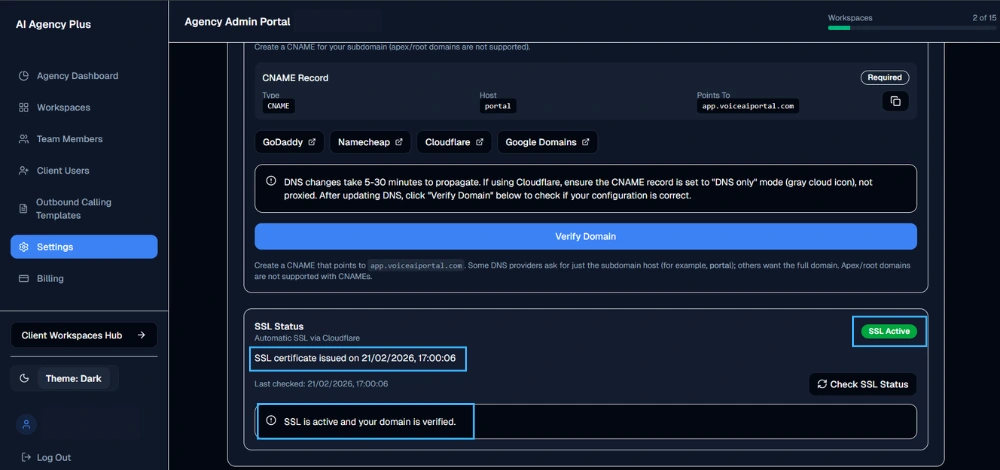
If verification fails:
- Check that you created a CNAME (not an A record)
- Verify the CNAME points to
app.voiceaiportal.comexactly - If using Cloudflare, ensure proxy is OFF (gray cloud)
- Wait longer for DNS propagation (try again in 10-15 minutes)
- Click Verify Domain again after making corrections
Step 7: Test Your Custom Domain
After successful verification:
- Open a new browser tab
- Navigate to your custom domain (e.g.,
https://dashboard.youragency.com) - You should see the Voice AI Portal login screen with your branding
- Test logging in to confirm everything works
Congratulations! Your custom domain is now set up and ready to use. Your agency and clients can now access Voice AI Portal through your branded domain.
Need Help?
If you encounter any issues during domain setup email: [email protected]