
A workspace is a dedicated, branded environment for one of your clients. It connects to their Voice AI provider, displays their agents and phone numbers, tracks their call analytics, and optionally enables outbound calling campaigns. Every client you onboard gets their own workspace so their data, settings, and activity remain completely separate.
Time to complete: ~10 minutes
Who this is for: Agency admins onboarding a new client
Before You Begin
You will need:
- An active Voice AI Portal agency account
- A Voice AI provider account with at least one agent configured — Retell AI, VAPI, or ElevenLabs
- An API key from that provider (instructions for each provider are in Step 1 below)
- Your client’s country and timezone — required for accurate call reporting and outbound campaigns
💡 One workspace per client. Each workspace is isolated — agents, phone numbers, analytics, and outbound campaigns belong exclusively to that workspace. Do not share a single workspace across multiple clients.
Opening the Create Workspace Wizard
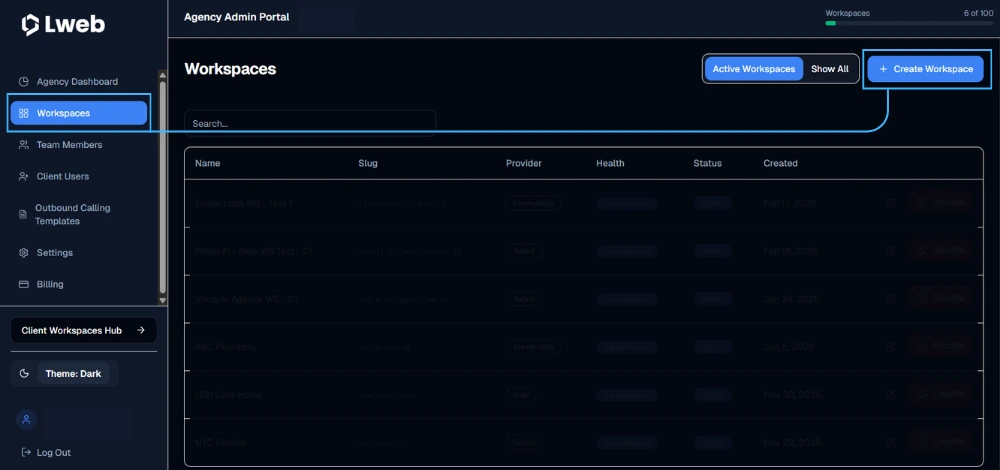
- In the left sidebar, click Workspaces.
- Click the Create Workspace button in the top right corner.
- A 6-step wizard opens. You can navigate back to any previous step using the Back button or by clicking a completed step in the progress bar at the top.
Step 1 of 6 — Connection
This step links your workspace to your client’s Voice AI provider account. You’ll name the workspace, choose a provider, and validate the API key to load their agents and phone numbers.
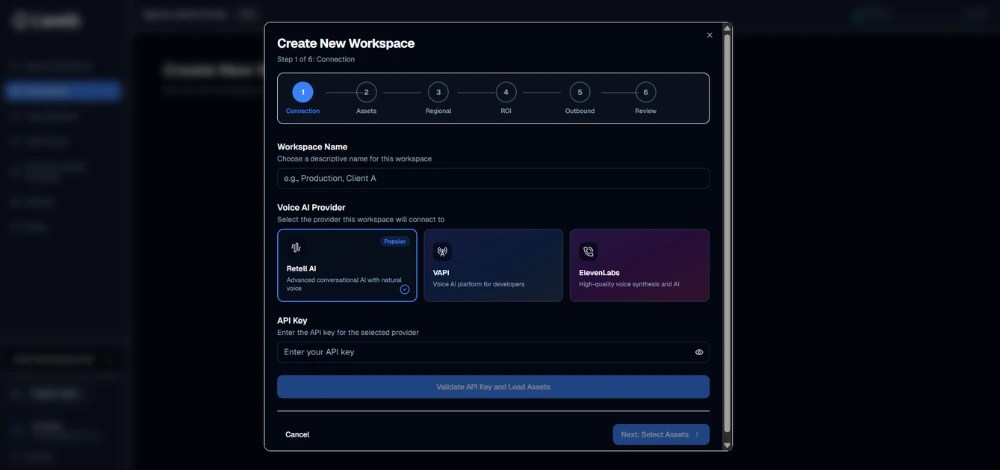
Name Your Workspace
In the Workspace Name field, enter a clear, descriptive name. This is visible only to you in the agency dashboard — not to your client.
💡 Naming tip: Use a consistent format like
Client Name – Provider – 01(e.g.,Acme Corp – Retell – 01). This makes it easy to identify workspaces at a glance when managing multiple clients across providers.
Choose a Voice AI Provider
Select the provider this workspace will connect to:
| Provider | Best For |
|---|---|
| Retell AI (Popular) | Advanced conversational AI with natural voice |
| VAPI | Developer-focused voice AI platform |
| ElevenLabs | High-quality voice synthesis and AI agents |
⚠️ One provider per workspace. Each workspace connects to a single provider. If a client uses multiple providers, create a separate workspace for each.
Get Your API Key
You need an API key from the provider’s dashboard. Follow the steps below for your chosen provider.
Retell AI
- Log in to your Retell dashboard at dashboard.retellai.com
- Navigate to Settings > API Keys — or go directly to dashboard.retellai.com/settings/api-keys
- Click Create new API key
- Give the key a descriptive name (e.g.,
Voice AI Portal – Client Name) - Copy the key immediately — it is shown only once
VAPI
- Log in to your VAPI dashboard at dashboard.vapi.ai
- Click API Keys in the main left navigation menu
- Click Add Key
- Enter a name for the key (e.g.,
Voice AI Portal – Client Name) - Leave all other settings at their default values
- Click Create and copy the Private API key — copy it immediately as it is shown only once
⚠️ Use a Private key, not a Public key. Public keys have restricted permissions and will fail validation in Voice AI Portal.
ElevenLabs
- Log in to your ElevenLabs dashboard at elevenlabs.io
- In the left menu, navigate to Developers > API Keys — or go directly to elevenlabs.io/app/developers/api-keys
- Click Create API Key
- Enter a name for the key (e.g.,
Voice AI Portal – Client Name) - Under permissions, select Write access for ElevenLabs Agents — this is required for Voice AI Portal to read and manage agents
- Copy the key — it is shown only once
⚠️ Write access is required. Read-only keys will fail validation. Ensure you select Write access for ElevenLabs Agents when creating the key.
Validate the API Key
- Paste your API key into the API Key field in Voice AI Portal.
- Click Validate API Key and Load Assets.
- Voice AI Portal connects to the provider and validates the key.
- On success you will see:
- A Validated Successfully confirmation banner
- A message confirming the number of agents and phone numbers found (e.g., “Connection successful! Found 3 agents and 1 phone number”)
- Click Next: Select Assets → to continue.
Step 2 of 6 — Assets
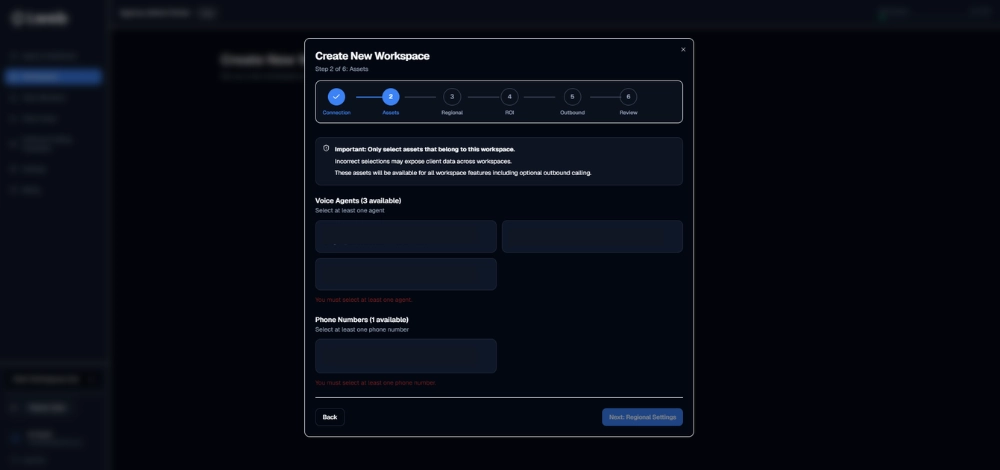
Voice AI Portal loads all agents and phone numbers associated with the API key you validated. Select which ones belong to this specific client workspace.
Select Voice Agents
Under Voice Agents, you will see all agents available in the connected provider account. Select every agent that belongs to this client.
- You can select multiple agents — there is no limit
- Each agent displays its name and unique agent ID for easy identification
- Selected agents are highlighted with a blue checkmark
Select Phone Numbers
Under Phone Numbers, select the phone number(s) assigned to this client.
- You can assign multiple phone numbers to a single workspace
- Phone numbers will be available for both inbound and outbound calling features
⚠️ Select only assets that belong to this client. If your provider account contains agents or numbers from multiple clients, be precise here. Incorrect selections will expose data from one client’s workspace to another. Each asset should appear in only one workspace.
💡 Assets sync after creation. Call data, agent configurations, and number details are pulled from the provider after the workspace is created — not during setup. You’ll see full asset details once the workspace is live.
- Click Next: Regional Settings → to continue.
Step 3 of 6 — Regional Settings
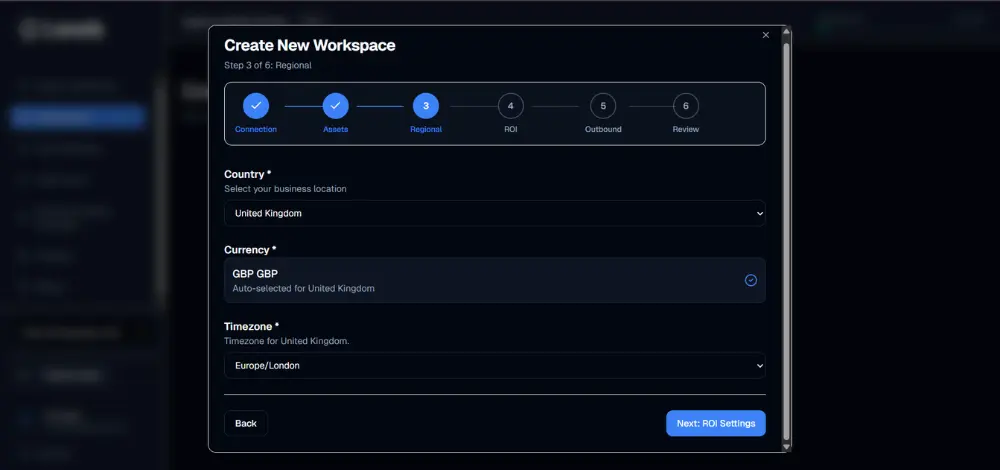
Regional settings determine the currency and timezone used across this workspace for call analytics, reporting, and outbound campaigns.
Country
Select your client’s country — not your agency’s country. This auto-populates the currency and timezone fields.
Currency
Currency is auto-selected based on the country you chose (e.g., selecting United Kingdom auto-selects GBP). This currency is used in ROI calculations and any billing-related displays in the client’s workspace.
Timezone
Timezone is also auto-selected based on country (e.g., United Kingdom auto-selects Europe/London). You can override this manually if the client operates in a different timezone to their country default.
⚠️ Choose your client’s timezone — not yours. Call timestamps, analytics graphs, and outbound campaign scheduling all run on this timezone. An incorrect timezone will cause call stats to appear at the wrong times and outbound campaigns to launch at unintended hours for your client.
- Click Next: ROI Settings → to continue.
Step 4 of 6 — ROI Settings
ROI Statistics give your clients a live view of how much they are saving compared to hiring human staff. When enabled, the client dashboard displays an ROI graph calculated from the cost inputs you define here.
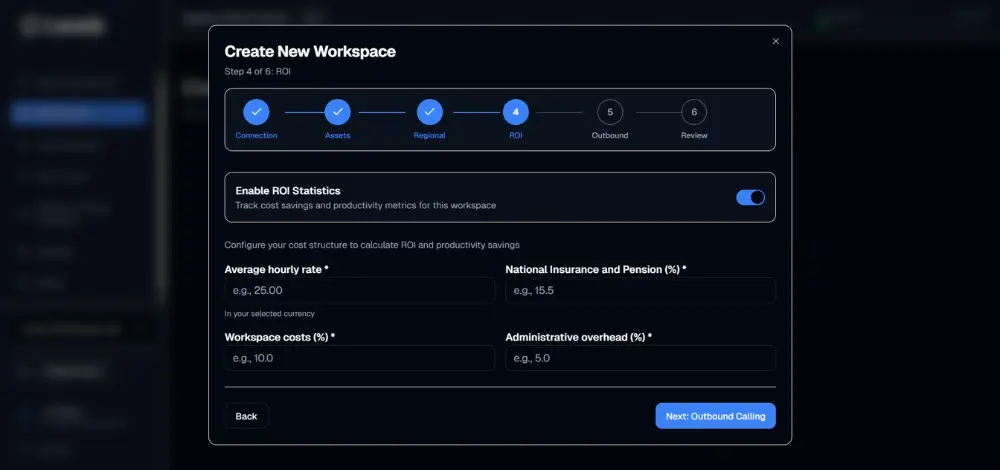
Enable ROI Statistics
Toggle Enable ROI Statistics on to activate ROI tracking for this workspace. When enabled, four cost input fields appear.
💡 Why this matters for your agency: ROI statistics are one of your strongest client retention and upsell tools. Clients who can see a live dollar figure of what they’re saving compared to a full-time employee are far less likely to churn — and far more receptive to expanding their AI deployment.
Configure Cost Structure
Enter values based on your client’s employment costs in their region. All values use the currency selected in Step 3.
| Field | What to Enter | Example (UK) |
|---|---|---|
| Average hourly rate | Fully-loaded hourly cost of a human agent in the client’s region | £25.00 |
| National Insurance & Pension (%) | Employer NI contributions + pension as a percentage | 15.5 |
| Workspace costs (%) | Overhead costs as a percentage (office, equipment, software) | 10.0 |
| Administrative overhead (%) | Management, HR, and admin time as a percentage | 5.0 |
💡 Agent multiplier: If the workspace has 5 agents deployed, the ROI calculation automatically multiplies by 5 — representing the cost of 5 human employees. The more agents a client runs, the more dramatic the savings figure. This makes ROI statistics especially powerful for clients with high agent counts.
If you are not ready to configure ROI now, leave the toggle off. You can enable and configure it later in workspace settings.
- Click Next: Outbound Calling → to continue.
Step 5 of 6 — Outbound Calling
Outbound calling allows your clients to launch AI-powered call campaigns directly from their workspace dashboard. When enabled, you configure the outbound infrastructure here and clients simply upload a lead list and press go.
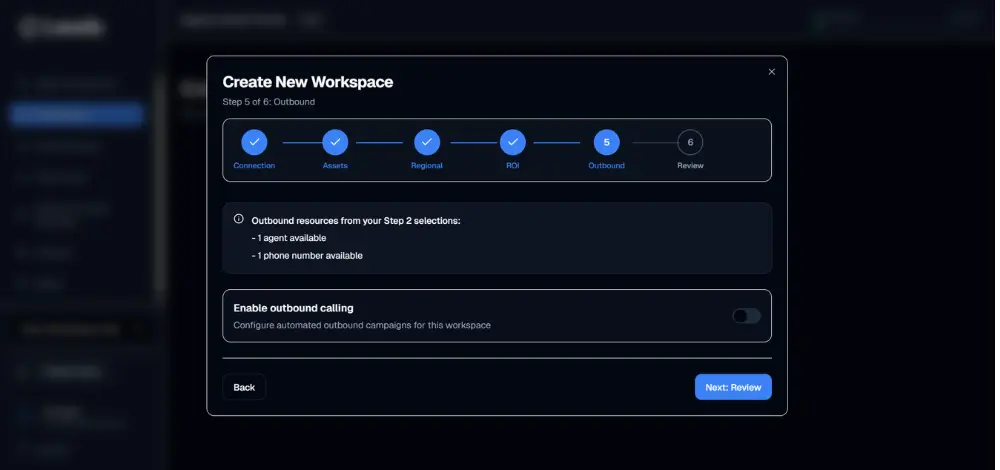
Enable Outbound Calling
Toggle Enable Outbound Calling on to activate outbound campaigns for this workspace.
When enabled, you will configure:
- Outbound calling agent — the AI agent that makes the calls
- Phone number — the number calls are made from
- Lead list fields — the data columns clients provide when uploading contacts
Once configured, your client can:
- Choose a pre-configured outbound pack
- Upload their lead list
- Launch a campaign — without any technical setup on their end
💡 Not ready to set up outbound now? Leave it disabled. You can enable and configure outbound campaigns from the workspace settings at any time after creation.
For a complete walkthrough of configuring outbound campaigns, see Set Up Outbound Campaigns.
- Click Next: Review → to continue.
Step 6 of 6 — Review
The final step displays a full summary of your workspace configuration before it is created. Review each section carefully.
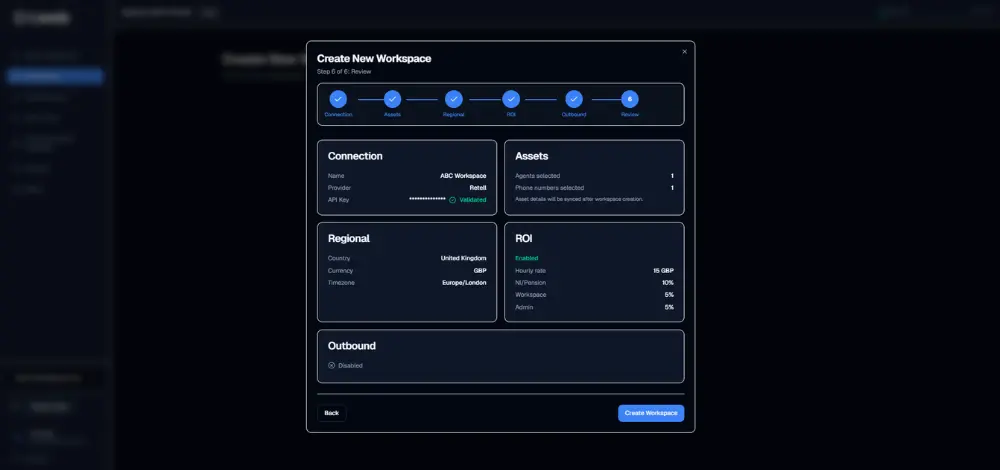
You will see four summary cards:
Connection
- Workspace name
- Voice AI provider
- API key status (should show Validated)
Assets
- Number of agents selected
- Number of phone numbers selected
- Confirmation that asset details sync after workspace creation
Regional
- Country, currency, and timezone
ROI
- Enabled or Disabled
Outbound
- Enabled or Disabled
If anything looks incorrect, click Back to return to that step and make changes.
Once everything is confirmed, click Create Workspace.
💡 What happens next: Voice AI Portal creates the workspace and begins syncing assets from your provider. Full agent details, call logs, and phone number configurations will be available within a few minutes. You’ll land on the workspace dashboard automatically after creation.
After Your Workspace is Created
Once created, your workspace is live and ready for your client. Your next steps are:
- Invite your client — Send them a passwordless magic code invite so they can access their workspace. See Invite a Client User.
- Configure ROI — If you skipped ROI setup, configure it now in workspace settings. See Configure ROI Statistics.
- Set up outbound — If you enabled outbound calling, finish configuring the campaign pack. See Set Up Outbound Campaigns.
Troubleshooting
| Issue | Solution |
|---|---|
| “API key validation failed” | Double-check the key was copied in full with no extra spaces. Ensure you used a Private key (VAPI) or Write access key (ElevenLabs). |
| “No agents found” after validation | The API key is valid but the provider account has no agents configured yet. Build at least one agent in your provider dashboard first, then re-validate. |
| “No phone numbers found” | No phone numbers are assigned in the provider account. Purchase or assign a number in your provider dashboard, then re-validate. |
| Wrong agents appearing in Step 2 | The API key belongs to a different provider account. Confirm you are using the correct account’s API key. |
| ROI graph not showing in client dashboard | ROI Statistics may be disabled — go to workspace settings and enable the toggle, then save. |
| Assets not syncing after workspace creation | Wait 2–3 minutes and refresh. If still not showing, check the API key is still valid in your provider dashboard. |
| ElevenLabs validation fails | Confirm Write access for ElevenLabs Agents was selected when creating the key. Read-only keys are not supported. |