
When you log in to Voice AI Portal for the first time, you land on your Agency Dashboard — your command centre for managing every aspect of your agency, clients, and workspaces. Everything you need to run your white-label voice AI business lives here, organised into two distinct portals: the Agency Admin Portal and the Client Workspaces Hub.
This doc gives you a clear picture of what each portal does, what you’ll find inside, and how they work together.
Two Portals, One Platform
Voice AI Portal is split into two separate but connected experiences, each designed for a different purpose:
| Portal | Who It’s For | What It Does |
|---|---|---|
| Agency Admin Portal | You — the agency admin | Manage all admin tasks: workspaces, clients, team, settings, and billing |
| Client Workspaces Hub | You — viewing as your client | See every client workspace exactly as they see it — a single pane of glass across all clients |
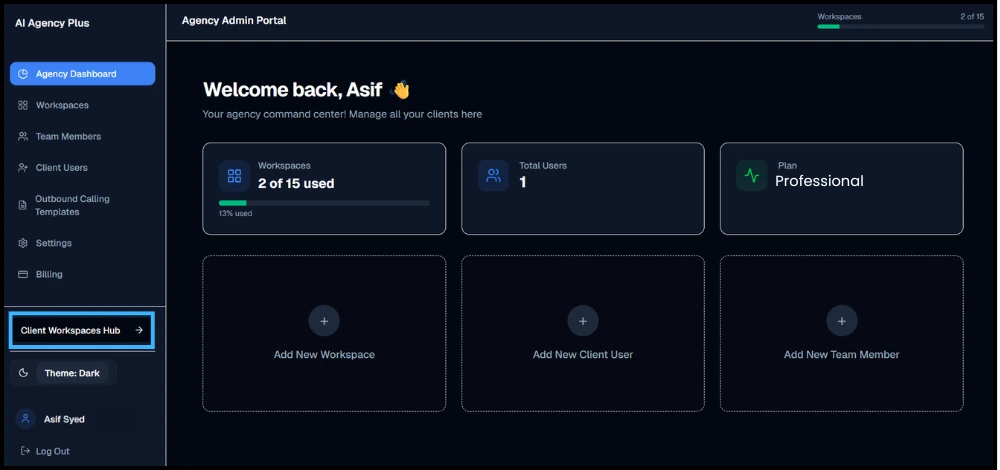
You switch between the two using the Client Workspaces Hub button at the bottom of the left sidebar, and return to admin using the Back to Agency Admin button.
Agency Admin Portal
The Agency Admin Portal is where all administrative work happens. When you first log in, this is where you land — your agency’s command centre.
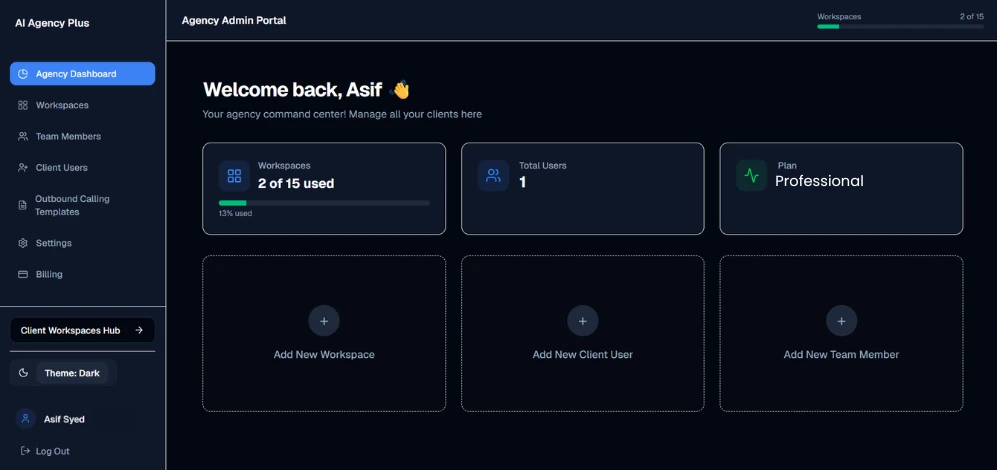
The dashboard immediately shows you three key metrics at the top:
- Workspaces — how many workspaces are active vs your plan limit (e.g., 2 of 15 used, 13% used)
- Total Users — total number of client users across all workspaces
- Plan — your current subscription tier (e.g., Trial, Starter, Pro, etc)
Below the metrics, three quick-action shortcuts let you jump straight into the most common tasks without navigating menus:
- Add New Workspace — opens the Create Workspace wizard
- Add New Client User — opens the Add Client User form
- Add New Team Member — opens the Team Member invite flow
Left Sidebar Navigation
Every section of the Agency Admin Portal is accessible from the left sidebar:
Agency Dashboard
Your home screen. Overview metrics, quick actions, and a snapshot of your agency’s current usage at a glance.
Workspaces
Create, edit, manage, and disable client workspaces. View workspace health, provider connection status, and quickly access any workspace for editing. See the full Workspaces documentation for everything workspaces-related.
Team Members
Invite and manage the agency team members who have access to the admin portal. Assign roles and control who can manage clients, workspaces, and settings.
Client Users
Add, manage, and deactivate client users. Assign clients to workspaces and monitor your seat usage against your plan limit. See Invite a Client User for the full setup guide.
Outbound Calling Templates
Create and manage reusable outbound campaign packs — pre-configured combinations of agent, phone number, and lead list fields. Clients simply pick a pack and upload their leads to launch a campaign.
Settings
Your agency’s central configuration hub — covering three tabs:
- General — Agency name, industry, contact information, and business address
- White-Label — Custom domain, logo, login page branding, and advanced SEO settings
- Email Hub — Resend API configuration and email template overrides
Billing
Manage your subscription plan, view invoices, and upgrade to unlock more workspaces or client seats.
Top Bar — Workspace Usage Indicator
The top right corner of every page in the Admin Portal shows a live Workspaces usage bar — a persistent at-a-glance indicator of how many workspaces are in use vs your plan limit. This helps you spot when you’re approaching your limit before it becomes a problem.
Client Workspaces Hub
The Client Workspaces Hub is your single pane of glass across all client workspaces. It lets you step inside any client’s workspace and see exactly what they see when they log in — the same dashboard, the same data, the same interface.
How to Access It
Click the Client Workspaces Hub → button at the bottom of the left sidebar in the Agency Admin Portal. To return to admin, click ← Back to Agency Admin in the same position.
What You’ll See
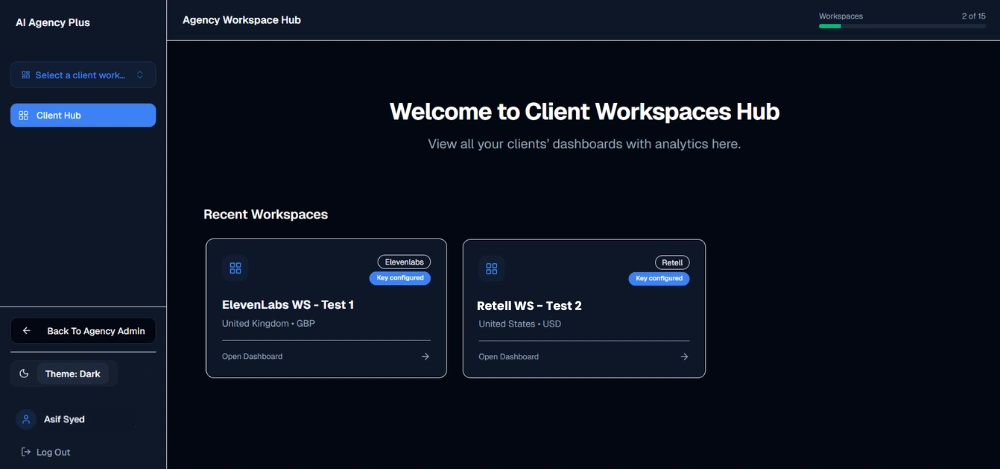
When you open the Client Workspaces Hub, you land on the hub home screen showing:
- Recent Workspaces — your most recently accessed workspaces displayed as cards, each showing:
- Workspace name
- Provider badge (e.g., Retell)
- Connection health status (e.g., Key configured)
- Country and currency
- An Open Dashboard → link
- Select a client workspace dropdown — at the top of the left sidebar, search and switch between any workspace instantly without returning to the hub home screen
Opening a Client Workspace Dashboard
Click Open Dashboard → on any workspace card to enter that client’s workspace. You now see exactly what your client sees when they log in:
- Their call analytics and usage data
- Their AI agents and phone numbers
- Their ROI statistics (if enabled)
- Their outbound campaigns (if enabled)
This is invaluable for client support, demos, and quality checking — you can walk through exactly what a client is experiencing without needing their login credentials.
💡 Use this before client calls. Before a client check-in or review call, open their workspace in the Client Workspaces Hub to familiarise yourself with their current stats, active agents, and any campaigns. You’ll always be one step ahead.
First Login Experience
When an agency admin logs in for the first time, the platform flow is designed to guide you through setup in order:
- You land on the Agency Dashboard in the Agency Admin Portal
- The top metrics show zeros — no workspaces, no users yet
- The three quick-action cards are the natural first step: Add New Workspace, Add New Client User, Add New Team Member
- The Settings section (left sidebar) is where you configure your white-label domain, branding, and email before inviting any clients
💡 Complete your white-label setup before inviting clients. Clients will receive login emails and access your portal from the moment you invite them. Make sure your custom domain, branding, and email are configured first so their first experience is fully branded. See the Getting Started Guides for the complete setup sequence.
What Lives Where — Quick Reference
| Task | Where to Go |
|---|---|
| Create a workspace | Agency Admin → Workspaces → Create Workspace |
| Invite a client | Agency Admin → Client Users → Add User |
| Update branding | Agency Admin → Settings → White-Label |
| Configure email | Agency Admin → Settings → Email Hub |
| Add a team member | Agency Admin → Team Members |
| View client campaigns | Agency Admin → Outbound Calling Templates |
| Manage billing | Agency Admin → Billing |
| View a client’s dashboard | Client Workspaces Hub → Open Dashboard |
| Check workspace health | Agency Admin → Workspaces (Health column) |
| Monitor usage limits | Agency Admin → Agency Dashboard (top metrics) |