
Once your workspace is created, the next step is giving your client access to it. Adding a client user creates their account, assigns them to their workspace, and automatically sends them a branded login email — no password setup required on their end.
Time to complete: ~2 minutes per user
Who this is for: Agency admins onboarding a client to their workspace
Before You Begin
You will need:
- At least one workspace already created — complete Create Your First Workspace if you haven’t done this yet
- Your client’s full name and email address
- Your custom email configured via Resend — if not set up, client emails will send from
[email protected]instead of your branded domain. See Configure Custom Email
💡 How client login works: Voice AI Portal uses passwordless authentication. When you create a user, they receive an email with a one-time verification code. They enter the code to log in — no password ever needs to be created or remembered. Codes expire after 10 minutes.
Understanding Seats & Limits
Before adding users, check your available seats.
- In the left sidebar, click Client Users.
- At the top of the page, the Usage & Limits panel shows:
- How many client user seats are currently used (e.g., 4 of 30 used)
- A visual progress bar showing remaining capacity
- If you are approaching your limit, click Upgrade for more end users to expand your plan.
⚠️ Seat limits apply per plan. Each client user account uses one seat. If you reach your limit, you will not be able to add new users until you upgrade or disable active users.
Adding a Client User
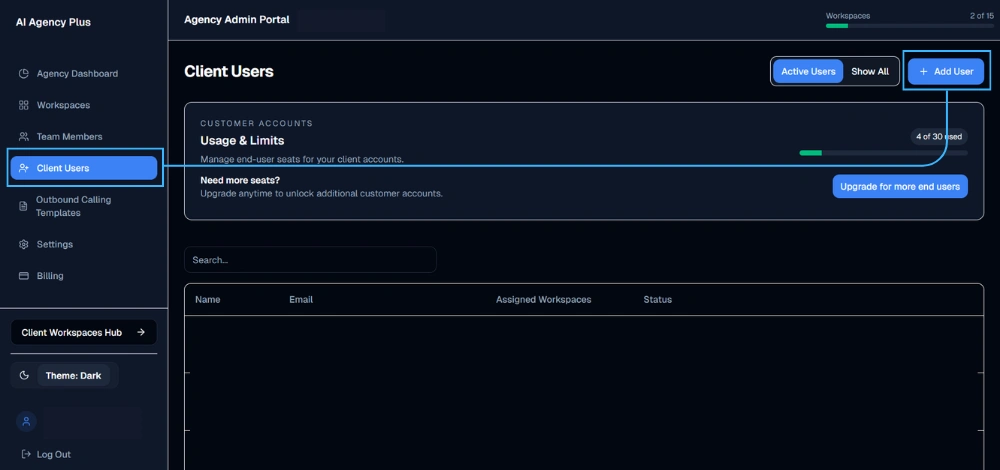
- In the left sidebar, click Client Users.
- Click the + Add User button in the top right corner.
- The Add Client User modal opens — this is a single step form.
Fill In User Details
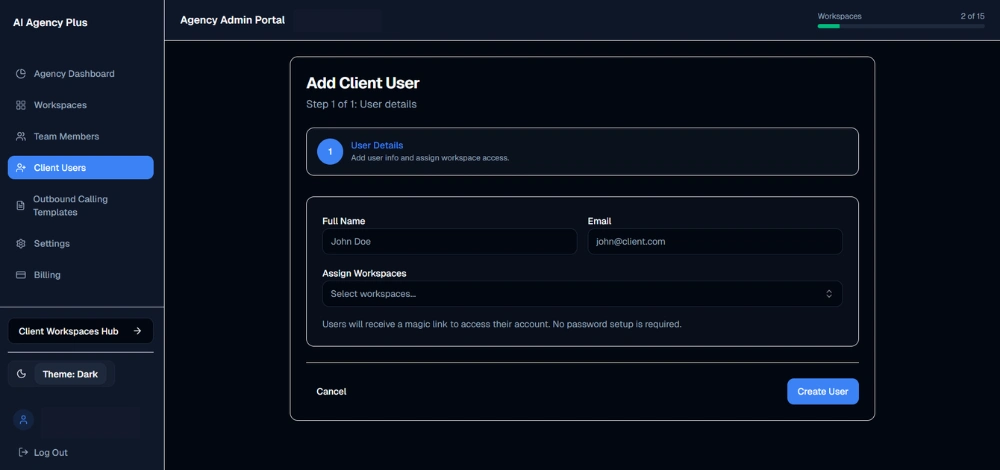
Full Name
Enter your client’s full name (e.g., John Doe). This appears in their portal and in any system emails sent to them.
Email
Enter your client’s email address (e.g., [email protected]). This is the address their login verification codes will be sent to. It must be a valid, accessible inbox — your client will need to check this email to log in.
⚠️ Double-check the email address before saving. If the address is incorrect, your client will not receive their login code and will not be able to access their workspace. Email addresses cannot be changed after creation — you would need to delete and recreate the user.
Assign Workspaces
Click the Select workspaces… dropdown and select the workspace(s) this user should have access to.
- You can assign a client to multiple workspaces — useful if one client has separate workspaces for different providers or use cases
- Only workspaces you have already created will appear in the dropdown
- If the dropdown is empty, create a workspace first
💡 One user, multiple workspaces: If a client has both a Retell and a VAPI workspace, assign both here. They will see a workspace selector when they log in and can switch between them.
- Click Create User.
What Happens After You Click Create User
Voice AI Portal immediately:
- Creates the client account and assigns it to the selected workspace(s)
- Sends a welcome email to the client’s email address from your configured sender (e.g.,
[email protected]) - Delivers a one-time verification code so the client can log in straight away
The user appears in your Client Users list instantly with an Active status.
💡 Let your client know to expect the email. The login code expires in 10 minutes. If they miss it, they can request a new code from the login page by entering their email and clicking Send Code again — a fresh code will be sent immediately.
What Your Client Experiences
Once you create their account, here is the client login flow:
- Client receives a welcome email from your agency’s branded sender
- Client visits your white-label portal URL (e.g.,
app.youragency.com) - Client enters their email address and clicks Send Code
- Client checks their inbox for the 6-digit verification code
- Client enters the code — they are logged in and land on their workspace dashboard
Every step of this flow uses your agency name, logo, and brand colours — clients never see any reference to Voice AI Portal.
Managing Client Users
Viewing All Users
The Client Users page lists all users with their name, email, assigned workspaces, and status. Use the:
- Search bar to find a specific user by name or email
- Active Users filter to show only currently active accounts
- Show All to include inactive or pending users
User Status Types
| Status | Meaning |
|---|---|
| Active | User account is live and accessible |
| Inactive | User has been deactivated — cannot log in |
Editing a User
Click on any user in the list to open their profile. From here you can:
- Update their full name
- Add or remove workspace assignments
- Deactivate or reactivate their account
Removing Workspace Access
To remove a client from a specific workspace without deleting their account, edit the user and deselect the workspace from the Assign Workspaces dropdown. Their account remains active — they simply lose access to that workspace.
Troubleshooting
| Issue | Solution |
|---|---|
| Client didn’t receive the welcome email | Check spam/junk folder. Verify Resend is configured in Settings > Email Hub. Confirm the email address entered is correct. |
| Login code expired before client used it | Client can request a new code from the login page at any time — enter email, click Send Code |
| “No workspaces” in the dropdown | No workspaces exist yet, create a workspace first before adding the client user |
| Client sees the wrong workspace | Edit the user and check their workspace assignments — add or remove as needed |
| Seat limit reached | Upgrade your plan from the Usage & Limits panel or deactivate unused accounts to free up seats |
| Need to change a client’s email | Delete the user and recreate with the correct email address — email cannot be edited after creation |
| Client can log in but sees no data | Assets may still be syncing — wait 2–3 minutes after workspace creation. Check workspace has agents + phone numbers assigned. |