
As your client’s voice AI setup evolves, you may need to add new agents, remove old ones, or update which phone numbers are assigned to their workspace. This doc covers how to sync the latest assets from your provider and update workspace assignments.
Time to complete: ~5 minutes
Who this is for: Agency admins updating agent or phone number assignments in an existing workspace
Category: Workspaces
Before You Begin
- Agents and phone numbers must exist in your provider account first — they cannot be created inside Voice AI Portal
- If you have added a new agent or phone number in Retell, VAPI, or ElevenLabs and it is not showing in Voice AI Portal yet, use Refresh Assets to pull the latest data before editing assignments
- You will need at least one agent and one phone number assigned to every workspace at all times
Step 1 — Open the Edit Workspace Wizard
All workspace updates are made through the Edit Workspace wizard. Navigate to your workspaces list, find the client workspace you want to update, and open it using the edit icon.
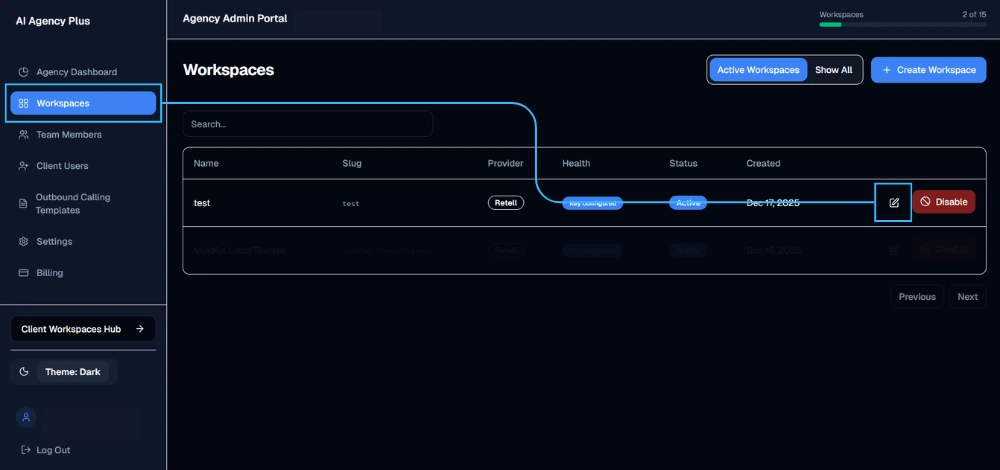
- In the left sidebar, click Workspaces.
- Find the workspace you want to update.
- Click the edit icon on the right side of the workspace row.
- The Edit Workspace wizard opens at Step 1 of 6: Connection.
Step 2 — Sync Latest Assets from Your Provider
If you have recently added new agents or phone numbers in your provider account, you need to sync them into Voice AI Portal before they appear in the asset selection list.
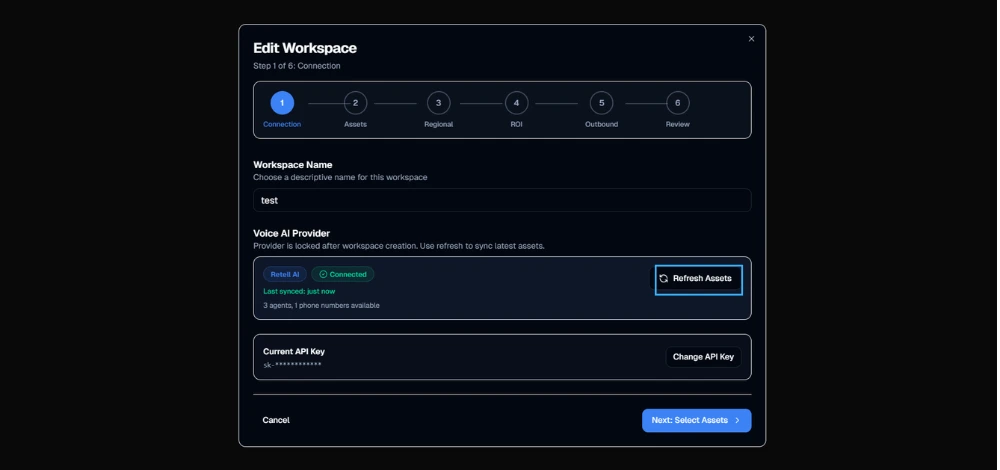
- On the Connection screen, check the last synced timestamp shown under your provider status badge.
- If it does not reflect your latest changes, click Refresh Assets.
- The status updates to “Last synced: just now” and the asset count refreshes — e.g., “4 agents, 2 phone numbers available”.
- Click Next: Select Assets → to proceed.
💡 Always refresh before editing assignments if you have made any changes in your provider dashboard since the workspace was last synced. This ensures the full list of available agents and numbers is shown in Step 2.
⚠️ Assets are managed in your provider dashboard, not in Voice AI Portal. To create a new agent or purchase a new phone number, log in to your Retell, VAPI, or ElevenLabs account, make the changes there, then return here and refresh assets.
Step 3 — Add or Remove Agents & Phone Numbers
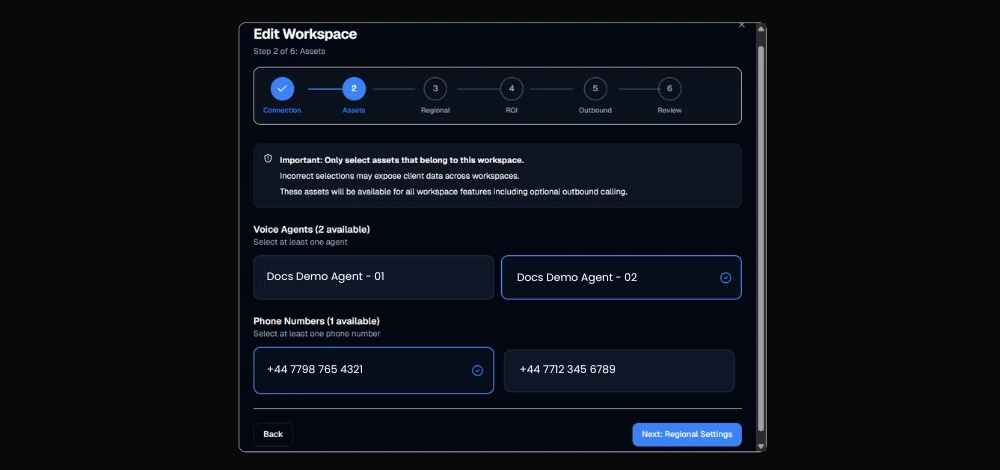
Step 2 of the wizard — Select Assets — displays every agent and phone number currently available in the connected provider account.
Adding an Agent or Phone Number
- Click any unselected agent or phone number to select it — it highlights with a blue checkmark border
- You can select multiple agents and multiple phone numbers — there is no upper limit
- Newly synced assets from your provider will appear here after refreshing in Step 1
Removing an Agent or Phone Number
- Click any currently selected (highlighted) agent or phone number to deselect it — the blue highlight is removed
- The asset remains in your provider account — it is simply no longer assigned to this workspace
⚠️ Minimum assignment required. At least one agent and one phone number must remain selected. If you need to fully swap out all agents, add the new ones before removing the old ones.
⚠️ Only assign assets that belong to this client. If your provider account contains agents or numbers from multiple clients, be precise. Assets assigned to this workspace are visible to that client — incorrect assignments expose one client’s data to another.
Step 4 — Save Your Changes
- Once your agent and phone number selections are correct, click Next: Regional Settings →.
- Click through Steps 3–6 without making changes unless you also want to update regional, ROI, or outbound settings.
- On the Review screen, confirm the updated asset counts are correct under the Assets summary card.
- Click Save to apply all changes.
The workspace dashboard updates immediately. Your client will see the updated agent and phone number list the next time they log in or refresh their portal.
Common Scenarios
Adding a new agent for a client you just built in Retell:
- Client creates the agent in Retell
- Edit workspace → Connection → Refresh Assets
- Next → Select Assets → select the new agent
- Click through to Review → Save
Removing an agent that is no longer in use:
- Edit workspace → Next → Select Assets
- Deselect the agent you want to remove
- Click through to Review → Save
- Optionally delete the agent from your provider dashboard if it is no longer needed there either
Phone number changed — old number replaced with new:
- Assign the new number in your provider account
- Edit workspace → Connection → Refresh Assets
- Next → Select Assets → deselect old number, select new number
- Click through to Review → Save
💡 Outbound campaigns use assigned phone numbers. If you remove a phone number that is currently configured as the outbound calling number for this workspace, outbound campaigns will stop working until a new number is assigned and configured in the outbound settings.
Troubleshooting
| Issue | Solution |
|---|---|
| New agent not appearing in Step 2 | Click Refresh Assets on the Connection screen first, then proceed to Select Assets |
| New phone number not showing | Same as above — Refresh Assets pulls the latest numbers from your provider |
| Asset still missing after refresh | Confirm the agent or number exists in your provider account and is assigned to the same account the API key belongs to |
| Can’t deselect last remaining agent | At least one agent must remain assigned — add a replacement before removing the last one |
| Client can’t see a newly added agent | Confirm the workspace was saved after selecting the new agent. Ask the client to refresh their portal. |
| Removed agent still showing in client portal | Clear browser cache or ask client to log out and back in |